


Overview
Profiling is an important part of the digital textile print process that, when done correctly, creates consistent and successful print production. Utilizing special tools and software, print operators can manage color in the dye-sublimation process like never before by finding the right paper, ink, and calender settings for each fabric.
What Is Print Profiling and Why Is It Necessary?
Print profiling is a process that uses printing software to provide the best match between paper, ink, calender settings, and fabric. It’s the process that will give you the best possible color results. To profile correctly, you need the proper equipment.
Spectrophotometer
A device that reads the color targets and identifies the color values (RGB/CMYK) until the exact match is achieved.
Note: the Barbieri spectrophotometer is the best model on the market but it’s expensive – around $10K. There are less expensive systems available that achieve good results.
Software
There are many color profiling software systems available. Some of the most popular are: Caldera, ErgoSoft, and Wasatch.
Consistent White Point
Let’s start with the white point. It’s important that the whiteness (white point) of the fabric does not shift from batch to batch so that you can achieve consistency when printing. For example, our partner Georg+Otto Friedrich uses an optical brightener to ensure a consistent white point from batch to batch.
Most of our competitors do not have a consistent white point, which will affect the quality of the print. It’s because they buy fabrics from several different mills and label the fabrics the same. Providing printable fabric with a consistent white point is all part of the TVF advantage.
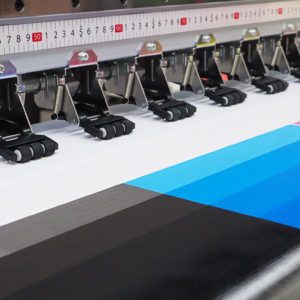
Printing the Profile
Most printers will work closely with a print specialist (either representing their print or software manufacturer) that will set up their standard profiles and teach them how to create profiles for new fabrics and projects. Profiling can be a tricky process but has evolved significantly over the last few years.
The process typically starts by printing color targets and charts on paper and transferring it onto the fabric. If too much ink is laid down and the paper is saturated, the edges will bleed. The profile will need to be altered until the desired result is achieved.
It’s important to factor in environmental conditions because they can impact the print quality. For example, changes in humidity and temperature can alter the transfer paper and create inconsistent results. Environmental conditionals can also impact how the print heads fire.
Ideally, the print studio should be climate controlled for best consistent results. If possible, store transfer paper horizontally in a climate controlled room and use it according to the date it arrived.
If the climate of your customer’s print shop is inconsistent, they may need to regularly check their profiles to ensure that they’re still accurate.
Color Experts
If your customer is experiencing print profiling problems, it’s not a bad idea to suggest they check out PRINTING United Alliance’s (formerly SGIA) Color Management Boot Camp.
You can also recommend that they contact their print manufacturer for profiling resources specific to their printer. For example, Mimaki and HP offer closed systems that provide profiles. Though it’s important to note, these resources do not take the place of individually profiling fabrics but they’re a good starting point.
Print Profiling Advice for Best Results
Tip 1: Each fabric should have its own printing setting and transfer setting. Without specific profiles, fabrics run the risk of running through the calender at too high of temperature or dwell time which can cause scorching (yellowing).
Tip 2: Scorch it! Intentionally run each fabric through the calender and scorch it (overheating it) until it turns yellow. As soon as it’s yellow, dial back the calendar dwell time in 10 second increments until it’s the same color as when the fabric went into the calender. Scorching it will allow your customer to know exactly how far they can push each fabric and maximize the amount of ink they can transfer onto the fabric!
Tip 3: Make a fabric setting chart for the operators that go on the printers and calender. These charts will ensure consistency because everyone will know to run the machinery in the exact same way. No freelancing on profiles!
Summary
Print profiling is considered the key ingredient in running a consistent and successful print shop. It’s important that every part of the print operation – from the paper and ink to calender and fabric – run in sync. In digital textile printing, there’s no one-size-fits-all solution and it’s important to take the time to optimize each individual fabric for full-color bloom and print clarity. While print profiling may seem intimidating to some, there are bountiful resources available to make the process seamless.